

Now that I have played around with my laser engraver for some time, I have to admit that I am amazed by what can be done with it. And I’m far from reaching the potential of what can be done. So, I thought I talk today about the pleasure of working with a laser engraver, and the problems as well.
So let;s start with how to find a laser engraver, in my case, and I’m usually a fairly impulsive person, it was doing some research. Honestly, doing so was more confusing then helpful in some ways. Mostly because the questions I had, were either not asked, or simply not answered. Like what affects the speed of the the engraving, is it the power of the laser, or depending on the motors? How much power will an engraving need, or rather how much will it cost me to do an engraving. Sure there were hints of those answers but not to my satisfaction. Then again, some of the articles I read where so technical that I had trouble understanding them.
In the end I mostly make the decision based on two things, reviews from other users and price. After all, I”m a small business and adding a new costly tool that I have no idea will be worth it is a risk. After all that I decided on a Bachin D8 4500 because it’s work area of 40cm x 50cm was one of the biggest in the price area I was willing to invest with $380 at Amazon.
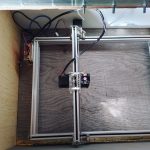
After I received the package, I have to admit I thought it wouldn’t take long to assemble it. I couldn’t have been more wrong. The video was nice but I wish they had used commentary instead of music. I had to disassemble some parts again because they where on the wrong side or upside down when it came to the next step. The hardest part was the little holding screws that are used to fixate the belts for the laser. Those belts have to be tight in order for the motors to move smoothly, a feet I found harder to archive then expected. In the end it took me around six hours to put it together. And the first thing I realize was that with several cats and two dogs, of which one is a pup, the thing was fairly vulnerable no matter where I placed it.
My advice if you have animals or children around, build a box for it. I used part of my desk to place some walls around it and used a clear acrylic slab as lid. Since the laser will burn through some of the things you use until you figure out the right settings, place a thick board below. One that you won’t need for anything else.
Now, I’m someone who simply starts trying things out and only starts finding instructions if I run into a problem that I can’t solve on my own. Like the impatient fool I sometimes am I put some wood down and used one of the in the software provided clip arts. I used the default setting the software came with and the result was nice, clear and smaller then I expected. Still, I was happy with the result and felt encouraged that using the engraver would be easy.
In general it is easy. The software provided is fairly easy to use. However, I wish there was a help section that explains what settings are recommended for which material. All they offer is a list that tells you if the machine can engrave and/or cut a material. Finding out the right settings for each material takes time and playing around with the settings, which in turn costs material that gets ruined until you find the right setting of power and speed.
Let’s start with the software provided by Bachin called Engraver Master. It is set up in three categories, picture printing, NC Sender and Quick tagging. I haven’t even tried the quick tagging yet. I started with the Picture printing part, engraving some of my small treasure boxes and hand-crafted plaques. Creating memorial plaques and boxes for pets we lost over the years or recently. Then I tried with fabric and that looked amazing as well, but took some time to find the right setting. Denim and heavier fabrics worked the best. While thin linen burned through even with a laser setting of 5%.
After that I tried plastic and discovered that for some reason the picture engraving mode won’t go over 10 cm in either direction. So I tried out the NC sender option of the program, which seemed to have no problem with the larger dimensions. However, both program parts have trouble with dimensions in general. While my designs where created with the size of the material in mind, once loaded into engraver master, I almost always had to scale it down to actually fit the selected material. Now the NC sender part also works a little differently and that alone made it a little complicated. First difference was that it has finer adjustment in regards to details and once the picture is loaded the rendering looks different to the one in the picture engraving part. It has three modes, full, cut and line. Here again it would have been helpful if Bachin would provide a more detailed explanation on what the differences of those setting are. Since I wanted to engrave I decided on the full mode, but even with the same setting I used with the picture engraving mode, the laser was running so fast, most of the engraving ended up unclear, interrupted and just messy. I have been playing around with the settings ever since and still haven’t figured out how to make the laser slow down enough to create a perfect engraving.
I also have trouble working out the cutting capability of the engraver. So far I haven’t managed to cut anything, but I’m sure I’ll get there in time. For now I’m trying out different materials and products, as well as exploring all the ideas I have. I’m also collecting a large database of graphics suited for engraving. At the same time I’m working on translating pictures into suitable graphics to make the engraving easier. For that I use my Corel Paint shop 2021.
Here are some things I engraved and personalized.


